
Jbox Prod. Sessions 04 (Part 1): Multi-Chain Instruments
- Apr 11, 2017
- 4 min read
Hey hey! I've got another production techniques blog for you today! In Part 1 I'll be going into how I set up my instruments rack for my live set; and in Part 2 how I usually go about mastering with Ozone 7, using its different plugins for individual uses, and how it helps craft my live set!
~
How I perform my tracks live
So just over a month ago I wrote a blog introducing the concept of performing live with Ableton, directed at producers/musicians with their music in the box - and want to transfer their finished projects into the live environment. Now that I've just finished my first live gig of 2017 over the weekend, I want to talk about how the final Ableton session ended up looking.
Whilst my setup is fairly minimal and still progressing to where I want it to be by the end of the year, I believe I've designed my current set in a way that really suits my style and is very fun to perform - which was one of my main points I covered in Prod. Sessions 01.
Here's an overview of what the session looks like, click each image to see them in full size with a short description about what's going on.


The first thing I want to introduce is how I quickly change what sounds I'm playing live with the Chain Selector in Ableton. There's a lot of different ways you can achieve this, here's a couple videos I researched when approaching the idea of live performance techniques:
This clip explains how you can start setting up Multi-Instruments really well, however they utilise multiple macros/mapped controls to turn on and off individual instruments. Since I'm a bit limited on mappable MIDI controls and have quite a lot of patches involved - this is where Chain Selectors come into play:
What I love about Ableton is just how customisable and free-flowing it can be. So I'll show you how I took the best of both of these videos and began to shape my Multi-Instrument to what suits my workflow:
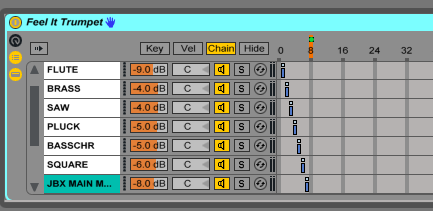
So you'll see at the bottom of the Session View I've got my Live Instruments rack opened up. With the 'Chain List' selected which is the second button down from the On/Off switch on the MIDI Instrument itself, a list of all the instruments I use for the performance appears. If you were to create a brand new MIDI track in Live and drop in any sound you like, this list will contain just that Instrument that you've dropped in - and with the Chain List open you can then put in as many as you like!
This is how I went about adding each instrument in the chain:
Firstly I would open up the project of the track which contains the sound I want to perform with. For example, one of my recent songs 'Feel It' (unreleased at this stage) uses a trumpet synth with a long chain of processing/FX that I want to be able to play out with a MIDI Keyboard and have it sounds pretty much exactly the same as it does in the song.
What I love about Ableton is that you can simply just highlight everything in the Device rack at the bottom of the screen, right-click and select Group and then press the save button on the new Instrument Rack you have just created!

It'll appear in the Instrument Racks folder inside my browser, and basically I've made my own preset synth patch:

Once I've got all my desired sounds inside the rack, I'll start moving each instrument in the chain to their own number in the list. In this case, my chain selector went up to 9:

I then right-click the selector itself (which is the orange line in the screenshot above) and map it to a macro of my choice. Then, with the MIDI overlay enabled I can select the macro 'Chain Selector' and then move whichever encoder/button on my MIDI controller that I'd like to select instruments with and then I'm done! I'll also note that I set a limit on that specific mapping in the MIDI Mappings tab to 9, as I only use 9 instruments and wouldn't want my controller to go past that value. This especially true with encoders as they are very sensitive if you don't set a limit to the value a full rotation of the knob could reach to.

I found it easy to just have the selector mapped to one of the encoders on my Alesis QX49 Keyboard so it's right there when I need it, especially since some of the songs require me to change sounds fairly quickly. The photo is post-gig so it's starting to wear off a bit, but I got a bit creative and taped around the encoder - labelling what sound correlates to where the needle is positioned.

When I mentioned that you can group all your processing/FX of a MIDI Instrument and save it all; something to keep note of is that your side-chain compression routing or any of your sends won't be preserved. So you'll have to copy the effects on your return and paste them into the rack of that instrument, or create a new return channel inside your Live Set project, and map its Dry/Wet level to another control of your choice . As for side-chaining, a pretty simple fix that will do the job is to set the input of the sidechain to whichever channel your track's audio is coming out of; then enable the EQ so you can direct the sidechain to only engage when your sub/kick frequency information hits - and lets it ignore the rest of the track's frequency content:

~
Part 2 of this production session is scheduled to go up in the next couple days so keep an eye out! I'll go into depth with how I use Ozone in regards to this live set and across the board in my productions, as I've found it's an incredible tool more-so than just a Mastering plugin. Sit tight!
Lachy :)


Comments